Table of contents
The holiday season is perfect for trying out new desserts, and nothing says festive like a Christmas bark recipe. This simple and delicious treat is made with chocolate, candy, and your choice of toppings, making it highly customizable. Whether you’re a seasoned baker or a beginner, this guide will help you master the ultimate Christmas bark recipe to share with family and friends.
This guide walks you through everything you need to know about crafting the perfect Christmas bark. From choosing the best ingredients to creative topping ideas and storage tips, you’ll have all the tools to make this holiday favorite shine. Let’s dive into the world of this festive dessert and bring some holiday magic to your kitchen!
Ingredients for Christmas Bark

To create the best Christmas bark recipe, start with high-quality chocolate and a variety of toppings. This recipe is designed to be versatile, allowing you to adapt it to your preferences. Follow the detailed steps below to make your Christmas bark recipe shine.
Core Ingredients
- Chocolate Base:
- Use high-quality chocolate as the foundation. Options include:
- Dark Chocolate: Rich and slightly bitter, perfect for balancing sweet toppings.
- Milk Chocolate: Creamy and sweet, ideal for a classic flavor.
- White Chocolate: Perfect for bright, festive bark with colorful toppings.
- Use high-quality chocolate as the foundation. Options include:
- Toppings:
- Create a festive mix of flavors and textures. Some popular options include:
- Crushed Candy Canes: Adds a peppermint flavor and a holiday feel.
- Mini Marshmallows: For a soft, chewy texture.
- Sprinkles: Festive shapes and colors add visual appeal.
- Dried Fruit: Cranberries, cherries, or apricots add a sweet, tangy twist.
- Nuts: Chopped almonds, pistachios, or pecans for crunch.
- Create a festive mix of flavors and textures. Some popular options include:
Optional Ingredients for Extra Flavor
- Sea Salt Flakes: Enhance the chocolate flavor and balance the sweetness.
- Shredded Coconut: For a tropical twist.
- Edible Glitter or Gold Dust: Adds an elegant sparkle.
Suggested Combinations
- Classic Peppermint Bark:
- Dark chocolate, crushed candy canes, and white chocolate drizzle.
- Nutty and Fruity Bark:
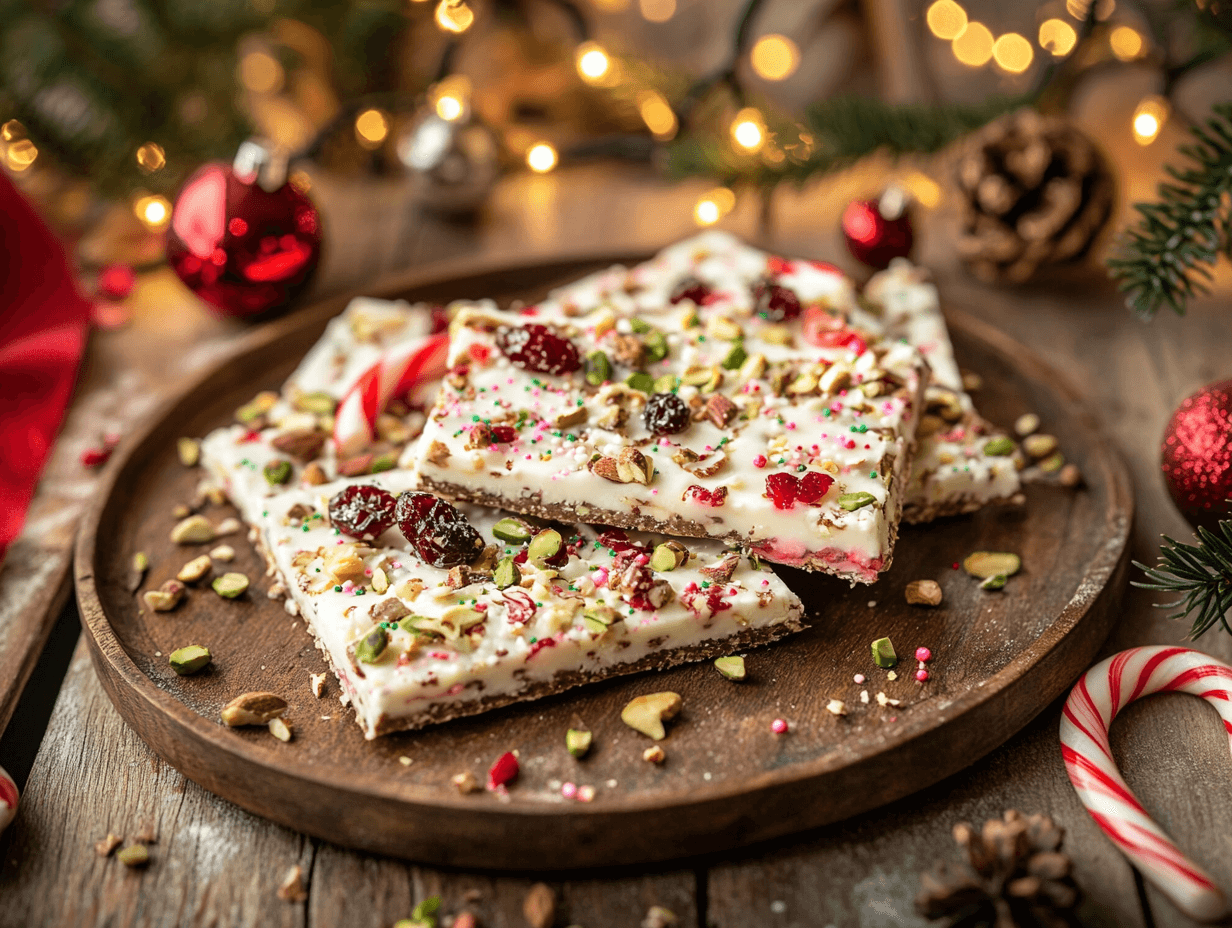
- Milk chocolate with dried cranberries, pistachios, and a sprinkle of sea salt.
- Triple Chocolate Bark:
- Layers of dark, milk, and white chocolate, topped with colorful sprinkles.
Now that you’ve gathered your ingredients, it’s time to prepare your tools and start crafting your Christmas bark masterpiece!
Essential Tools and Equipment
Creating the perfect Christmas bark is not only about the ingredients but also about having the right tools. These items will make the process easier and ensure your bark looks and tastes amazing.
Must-Have Tools
- Microwave-Safe Bowl or Double Boiler
- For melting chocolate. A microwave-safe bowl allows for quick melting, while a double boiler offers more control over heat.
- Silicone Spatula
- Perfect for stirring melted chocolate and spreading it evenly on the baking sheet.
- Baking Sheet
- A flat, even surface to spread the chocolate base. Line it with parchment paper to prevent sticking.
- Parchment Paper or Silicone Baking Mat
- Ensures easy removal of the bark once it has set.
- Knife or Kitchen Mallet
- For chopping chocolate or breaking the finished bark into pieces.
- Measuring Cups and Spoons
- Helps to measure toppings for a balanced flavor.
Optional Tools for Enhanced Results
- Candy Thermometer: Useful if you want to temper chocolate for a glossy finish and better snap.
- Piping Bags or Squeeze Bottles: For adding decorative chocolate drizzles or patterns.
- Offset Spatula: Makes spreading chocolate on the baking sheet even easier.
Prep Work to Save Time
Before you start, set up your workstation:
- Line your baking sheet with parchment paper or a silicone mat.
- Arrange your toppings in small bowls for easy access.
- Chop any large toppings, such as nuts or dried fruits, into smaller pieces.
Having everything ready to go will make the process smooth and enjoyable.
Now that your tools and ingredients are ready, let’s move on to the fun part—making the bark itself!
Step-by-Step Guide to Making Christmas Bark
Making Christmas bark is a straightforward process that even beginners can master. Follow these simple steps to create a festive, delicious treat perfect for sharing.
Preparing the Base Chocolate
- Melt the Chocolate:
- Microwave Method: Place chopped chocolate or chocolate chips in a microwave-safe bowl. Heat in 20-second intervals, stirring after each, until fully melted.
- Double Boiler Method: Fill a saucepan with an inch of water and bring it to a simmer. Place a heatproof bowl on top, ensuring it doesn’t touch the water. Add the chocolate and stir until smooth.
- Optional Tempering:
If you want a shiny, professional-looking finish, temper the chocolate. Use a candy thermometer to heat and cool the chocolate to specific temperatures (e.g., 113°F–120°F for dark chocolate, 100°F–110°F for milk or white chocolate).
Adding Holiday Toppings
- Spread the Chocolate:
Pour the melted chocolate onto the prepared baking sheet lined with parchment paper or a silicone mat. Use a silicone spatula or offset spatula to spread it evenly into a thin layer, about ¼ inch thick. - Sprinkle the Toppings:
While the chocolate is still warm and pliable, sprinkle your chosen toppings evenly across the surface. Be creative and aim for a mix of colors, textures, and flavors. Popular combinations include:- Crushed candy canes for a peppermint crunch.
- Pistachios and dried cranberries for a red-and-green holiday look.
- Festive sprinkles for a cheerful touch.
- Press Toppings Lightly:
Gently press the toppings into the chocolate to ensure they stick as the bark sets.
Setting and Breaking the Bark
- Let the Bark Set:
- Room Temperature: Allow the bark to cool and harden naturally at room temperature for about 1–2 hours.
- Refrigerator: If you’re in a hurry, place the baking sheet in the refrigerator for 20–30 minutes. Avoid freezing, as this can affect the texture.
- Break the Bark:
Once the chocolate is fully set, lift it off the parchment paper. Use your hands or a sharp knife to break it into uneven, rustic pieces. - Serve and Enjoy:
Arrange the pieces on a festive platter or package them as gifts for family and friends.
Creative Variations and Customization
The beauty of Christmas bark lies in its versatility. You can easily customize it to suit different tastes, dietary needs, and festive themes. Below are some creative variations to inspire your holiday bark creations.
White Chocolate Peppermint Bark
- Ingredients:
- White chocolate (12 oz)
- Crushed candy canes (½ cup)
- Peppermint extract (optional, ¼ tsp)
- Instructions:
- Melt the white chocolate using your preferred method.
- Stir in peppermint extract for extra flavor.
- Spread the melted chocolate on the prepared baking sheet and sprinkle generously with crushed candy canes.
- Let it set and break into pieces.
Nutty and Fruity Bark
- Ingredients:
- Dark chocolate (12 oz)
- Dried cranberries (¼ cup)
- Chopped pistachios (¼ cup)
- Sea salt flakes (optional, a pinch)
- Instructions:
- Melt the dark chocolate and spread it on the baking sheet.
- Scatter dried cranberries and chopped pistachios over the surface.
- Sprinkle lightly with sea salt for a gourmet touch.
- Allow to set and break into pieces.
Triple Chocolate Bark
- Ingredients:
- Dark chocolate (8 oz)
- Milk chocolate (8 oz)
- White chocolate (8 oz)
- Festive sprinkles (optional, ¼ cup)
- Instructions:
- Melt and spread the dark chocolate as the base layer. Allow it to set slightly.
- Add a layer of melted milk chocolate, spreading evenly.
- Finish with a layer of white chocolate, then top with sprinkles for a festive finish.
- Let it set completely before breaking.
Vegan and Gluten-Free Options
- Ingredients:
- Vegan dark chocolate or white chocolate (ensure it’s dairy-free)
- Gluten-free toppings such as dried fruits, coconut flakes, or nuts
- Instructions:
- Follow the same melting and layering instructions as the original recipe.
- Use toppings certified gluten-free and vegan for dietary inclusivity.
Holiday Theme Ideas
- Winter Wonderland:
- Use white chocolate as the base and add blue sprinkles, edible glitter, and snowflake-shaped candies.
- Red and Green Delight:
- Combine milk chocolate with red and green M&M’s, dried cherries, and chopped pistachios.
- Candy Cane Forest:
- Create a white chocolate base, topped with miniature candy canes and chocolate chips.
Now that you have a variety of options, let’s move on to the final steps: storing and presenting your Christmas bark for maximum impact.
Storage and Presentation Tips

Once you’ve made your Christmas bark, storing it properly and presenting it beautifully will ensure it stays fresh and festive for the holiday season. Here’s how to do it like a pro.
How to Store Christmas Bark
- Room Temperature:
- Store the bark in an airtight container at room temperature for up to two weeks.
- Keep it in a cool, dry place away from direct sunlight or heat sources to prevent melting.
- Refrigeration:
- For longer storage, refrigerate the bark in a sealed container. This keeps it fresh for up to a month.
- Ensure the bark is fully set before refrigeration to prevent condensation from forming.
- Freezing for Future Use:
- Wrap the bark in parchment paper or wax paper, then place it in a freezer-safe bag or container.
- Store in the freezer for up to three months. Thaw at room temperature before serving.
Creative Packaging Ideas for Gifts
Christmas bark makes an excellent homemade gift. With the right packaging, you can turn your bark into a delightful present for loved ones.
- Holiday-Themed Bags or Boxes:
- Use festive cellophane bags tied with ribbon. Add a gift tag for a personal touch.
- Decorate small gift boxes with holiday stickers or wrap them with colorful wrapping paper.
- Mason Jars:
- Layer bark pieces in mason jars and seal with a holiday-themed lid or fabric cover.
- Attach a handwritten recipe card for a thoughtful addition.
- Custom Labels:
- Print custom labels with messages like “Homemade Christmas Bark” or “Made with Love.”
- Stick them on jars or boxes for a professional finish.
- Decorative Trays or Platters:
- Arrange bark pieces on a festive tray and cover with clear plastic wrap.
- Include a small note or card explaining the flavors and ingredients.
Serving Suggestions
- Festive Dessert Table:
- Place the bark on a decorative holiday platter. Add sprigs of holly or small ornaments for extra charm.
- Snack Mix Addition:
- Break the bark into smaller pieces and mix it with pretzels, popcorn, and nuts for a holiday snack mix.
- Coffee or Hot Cocoa Pairing:
- Serve bark alongside hot beverages like coffee, tea, or hot cocoa for a cozy holiday treat.
Frequently Asked Questions
How do I prevent chocolate from seizing while melting?
To avoid seizing, ensure your utensils and bowls are completely dry, as even a drop of water can cause chocolate to seize. Melt chocolate slowly over low heat for best results.
Can I use pre-made chocolate bark for this recipe?
Yes, you can use pre-made chocolate bark as a base and simply add your own toppings for customization. However, freshly melted chocolate provides better texture and flavor.
How thick should I make my bark?
Aim for a thickness of about ¼ inch. This ensures the bark is easy to break but still sturdy enough to hold toppings.
for similar recipe
Conclusion
Making a homemade Christmas bark recipe is a delightful way to celebrate the holidays. With simple ingredients and customizable options, this Christmas bark recipe will become a staple for your festive celebrations.
So gather your ingredients, get creative with your toppings, and start spreading holiday magic with this delightful recipe. Happy holidays!

